
One of the aspects of my job that I love is the week long proof of concept bootcamps. What it entail is me (or one of my team members) coming onsite to work with your team to build out a POC in just one week. They all vary some what, but I try to stick to a formula that works for me. I spend the first day with the whole team ironing out the Model. This is the trickiest part to get right, because if the model is right, the queries will fall right into place. If the model has to be changed significantly on day 3 let’s say, then a ton of work has to be redone or at least greatly modified. The goal of the end of day one is to have something that looks like the following:
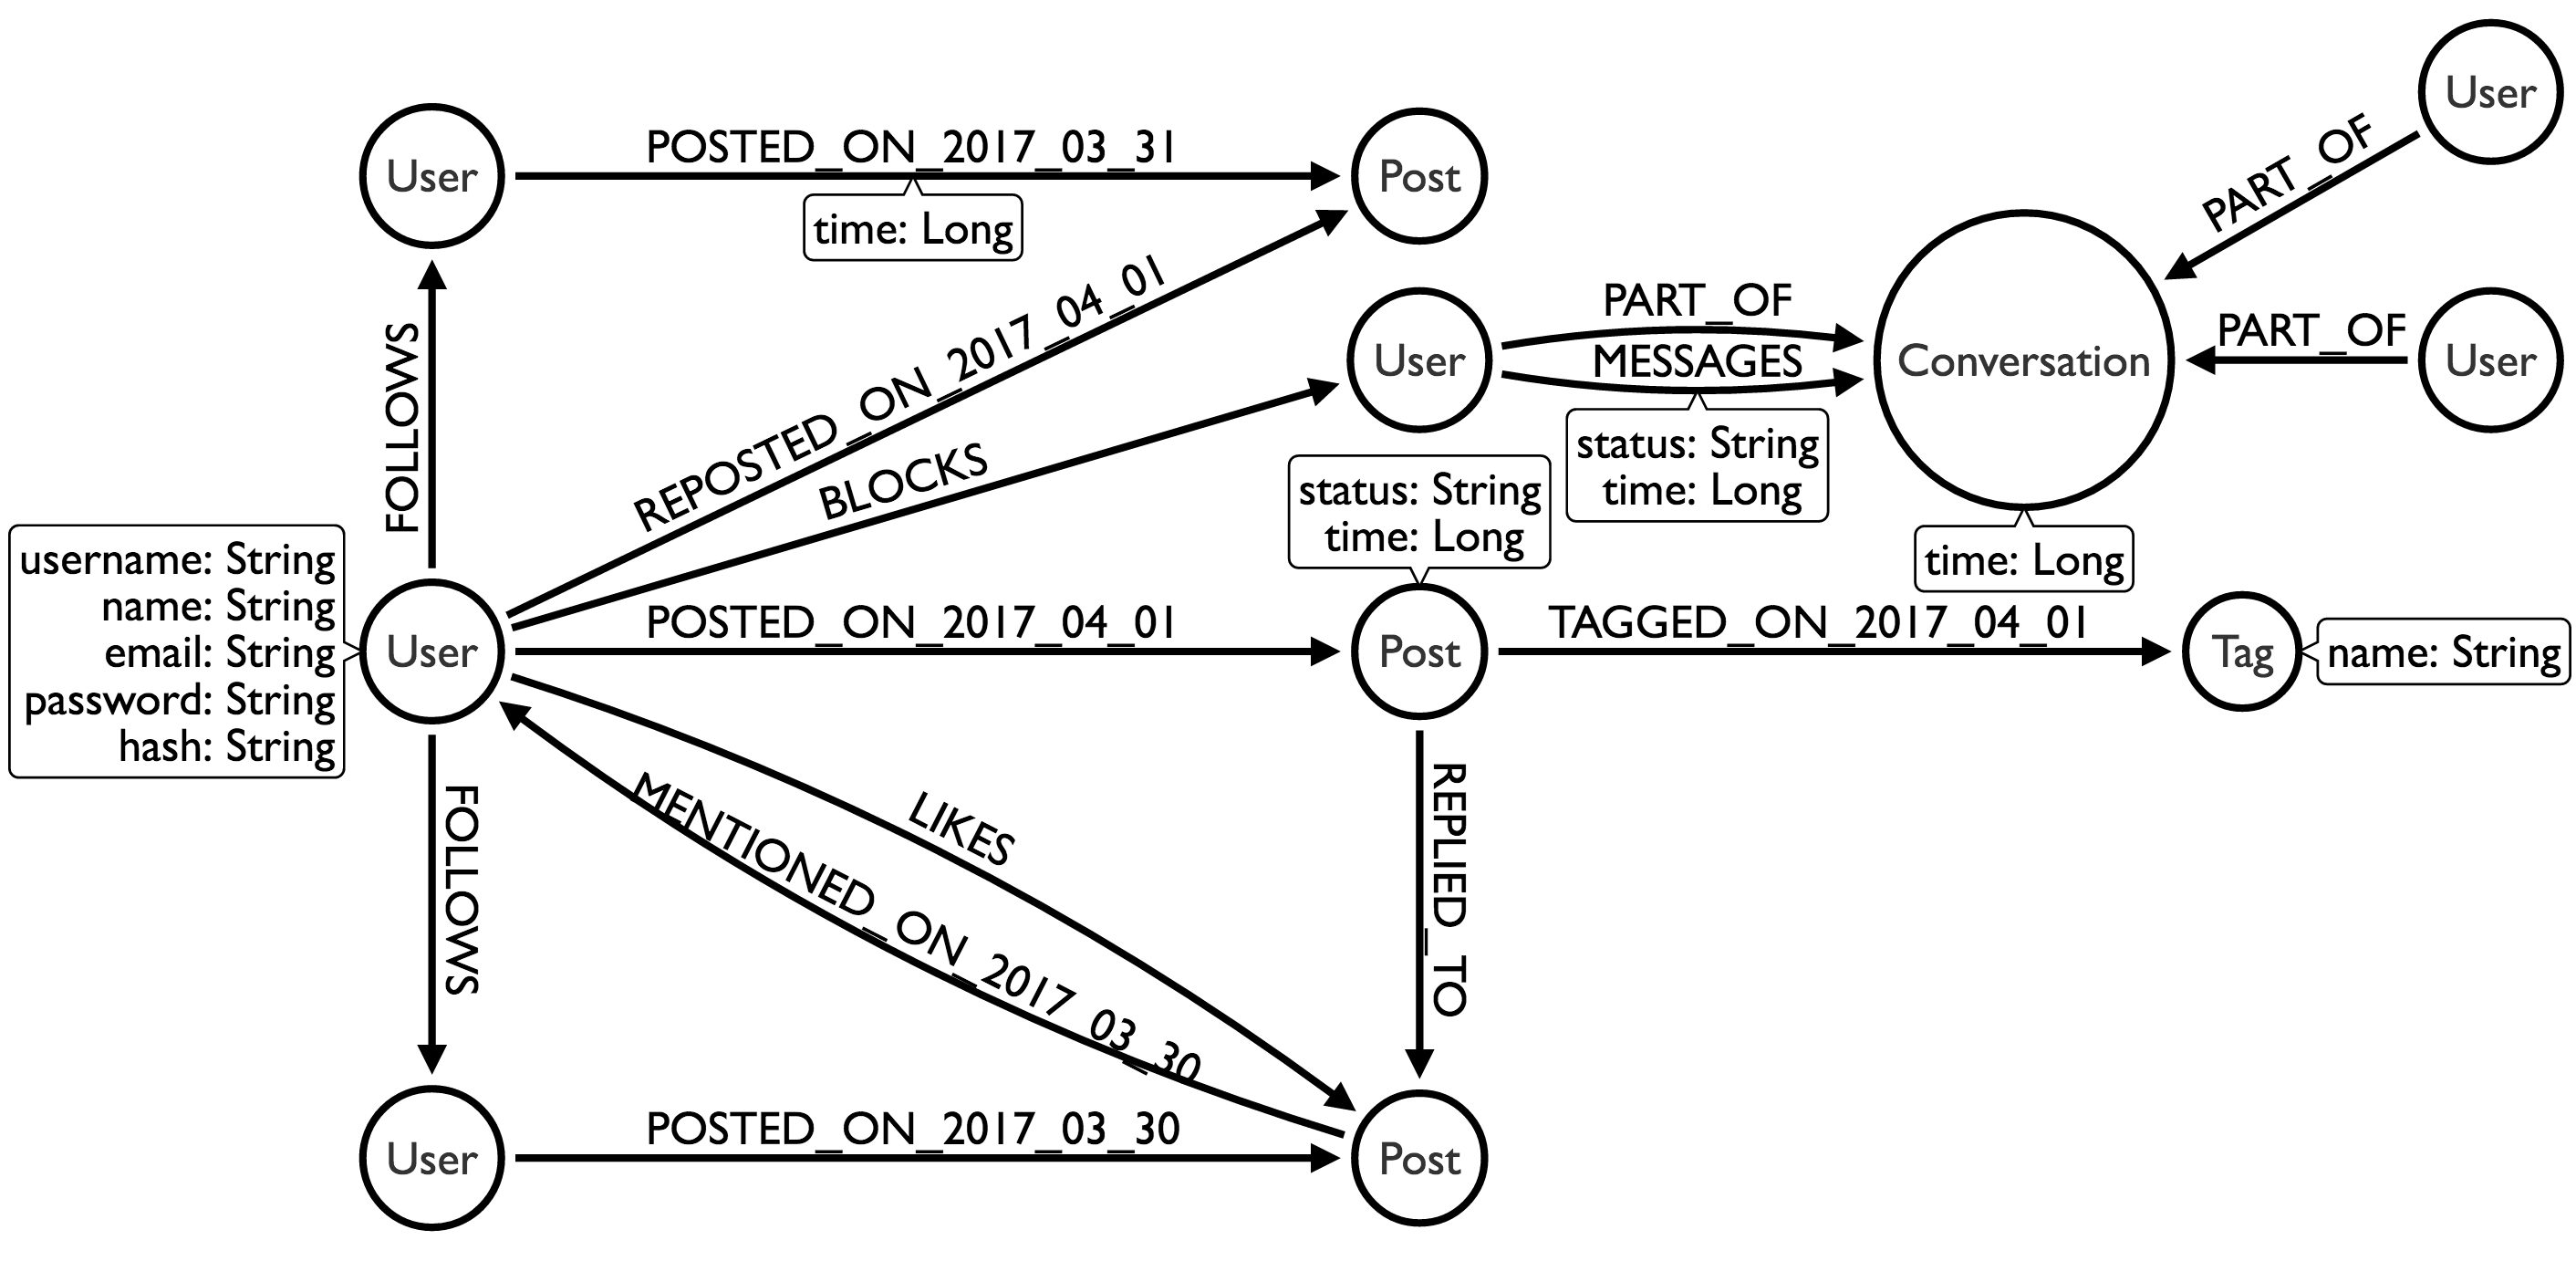
This is the model that I will be using for this POC. At least at this point, there may be some changes along the way. There is a lot of discussion and alternatives hidden in that model. If you want to see an example of a model emerging, take a look at my modeling airline flights blog post. Why did I choose to split the POST relationships by date, but not the FOLLOWS relationship? To answer this question it is important to look at both the data we have and the questions we are going to ask. We are lucky that we kinda know how Twitter works already so we’re not going at a brand new application. We can say with some certainty that optimizing for reading the timeline quickly is more important than getting a list of recent followers quickly.
We have two types of users on Twitter. The average user which follows and is followed by a few thousand users at most… and the celebrities which have millions of users. For both types of users, getting their timeline is very important. We can traverse the graph from the User, to the Users they FOLLOW by a single relationship type, and then out to that days Posts. If we had split the FOLLOWS relationships we’d have to work a little harder every single time searching for all the people we FOLLOW and that work would get worse as time progressed.
Having a single FOLLOWS relationship also enables us to use getDegree for both incoming and outgoing directions. The celebrities on Twitter are less concerned with who follows them, but very concerned about the number of followers as a measure of their popularity. One thing we can do to appease the occasional celebrity curiosity of seeing who follows them is to keep track of the last few followers in an array and grabbing them directly instead of following the FOLLOWS relationship. We will consider that an optimization and exclude it from this POC for now.
Once we have our model, what I like to do next is build an API. In a typical POC bootcamp we may be asked to solve a single very complex or time sensitive traversal, or we be asked to help build a Minimum Viable Product. In that short time, the most we can really do is about 20 HTTP endpoints. I like the HTTP API approach because it allows Neo4j to come in as a Service rather than just a database. A service that plugs right into any modern architecture using standard HTTP to communicate between services. It doesn’t matter if the clients are in Java, .Net, Ruby or any other language, they all have robust mature http libraries. For this POC the HTTP API I came up with looks like this:
        :GET    /v1/users/{username}
        :GET    /v1/users/{username}/profile
        :POST   /v1/users {username:'', password:'', email:'', name:''}
        :GET    /v1/users/{username}/followers
        :GET    /v1/users/{username}/following
        :POST   /v1/users/{username}/follows/{username2}
        :DELETE /v1/users/{username}/follows/{username2}
        :GET    /v1/users/{username}/posts
        :POST   /v1/users/{username}/posts {status:''}
        :POST   /v1/users/{username}/posts/{username2}/{time}
        :GET    /v1/users/{username}/likes
        :POST   /v1/users/{username}/likes/{username2}/{time}
        :DELETE /v1/users/{username}/likes/{username2}/{time}
        :GET    /v1/users/{username}/blocks
        :POST   /v1/users/{username}/blocks/{username2}
        :DELETE /v1/users/{username}/blocks/{username2}
        :GET    /v1/users/{username}/mentions
        :GET    /v1/users/{username}/timeline
        :GET    /v1/users/{username}/recommendations/friends
        :GET    /v1/users/{username}/recommendations/follows
        :GET    /v1/tags/{tag}
I like the HTTP API approach because if for some reason Neo4j isn’t the right fit at least the customer has API to show for it which they can try to implement in some other technology. I mentioned in part one, that all the source code is already available. So while I may cut and paste chunks to explain what I did, you can also follow the complete source for clarity. Keep in mind some of it may change as we go further into this series.
Let’s get to it. Spin up IntelliJ and create a new project using Maven. You’ll want to edit your pom.xml file to look like the one in the repository which brings in the required Neo4j dependencies. I’m plugging into Codeship and Coveralls to keep me honest.

Codeship takes care of our build and whines at us when tests fail.

Coveralls makes sure I actually write tests. Like many of us that came from the Ruby on Rails community, I owe any testing I do in great part to Gregg Pollack and Jason Seifer. I just wanted to say thank you and pay my respects.
Let’s get started with our first class “Users”. The application is going to want to authenticate users, so let’s write our createUser method. This will be a POST action call with a JSON payload that we need to validate. Assuming it is good, we will see if the username or email are not already taken. Next we will create the node and assign it the properties from our JSON payload, adding an MD5 Hash property of their lowercased email address. I know MD5 is obsolete as a cryptographic function, but it is used by Gravatar to provide image services for our users.
@Path("/users")
public class Users {

    private static final ObjectMapper objectMapper = new ObjectMapper();
    @POST
    public Response createUser(String body, @Context GraphDatabaseService db) throws IOException {
        HashMap parameters = UserValidator.validate(body);
        Map<String, Object> results;
        try (Transaction tx = db.beginTx()) {
            Node user = db.findNode(Labels.User, USERNAME, parameters.get(USERNAME));
            if (user == null) {
                user = db.findNode(Labels.User, EMAIL, parameters.get(EMAIL));
                if (user == null) {
                    user = db.createNode(Labels.User);
                    user.setProperty(EMAIL, parameters.get(EMAIL));
                    user.setProperty(NAME, parameters.get(NAME));
                    user.setProperty(USERNAME, parameters.get(USERNAME));
                    user.setProperty(PASSWORD, parameters.get(PASSWORD));
                    user.setProperty(HASH, new Md5Hash(((String)parameters.get(EMAIL)).toLowerCase()).toString());
                    results = user.getAllProperties();
                } else {
                    throw UserExceptions.existingEmailParameter;
                }
            } else {
                throw UserExceptions.existingUsernameParameter;
            }
            tx.success();
        }
        return Response.ok().entity(objectMapper.writeValueAsString(results)).build();
    }
Nothing too crazy here. Getting our user is also pretty simple. The “findUser” method used below either finds the user by their username or throws an exception. Once the user is found, we just want all their properties sent back including their password.
    @GET
    @Path("/{username}")
    public Response getUser(@PathParam("username") final String username, @Context GraphDatabaseService db) throws IOException {
        Map<String, Object> results;
        try (Transaction tx = db.beginTx()) {
            Node user = findUser(username, db);
            results = user.getAllProperties();
            tx.success();
        }
        return Response.ok().entity(objectMapper.writeValueAsString(results)).build();
    }
We’ll want a different method for the public information about a user. That is where getProfile comes in. In our getProfile method we will follow the exact same steps as getUser but instead of returning all Properties, we will remove EMAIL and PASSWORD as well as compute some statistics about their relationships. Those node::getDegree operations are very fast because Neo4j pre-computes and stores the answer when relationships are added instead of counting every time. The only tricky one is “posts” since those are “Dated Relationship Types” but we can use the degrees of other relationship types to calculate the right answer.
    public static Map<String, Object> getUserAttributes(Node user) {
        Map<String, Object> results;
        results = user.getAllProperties();
        results.remove(EMAIL);
        results.remove(PASSWORD);
        Integer following = user.getDegree(RelationshipTypes.FOLLOWS, Direction.OUTGOING);
        Integer followers = user.getDegree(RelationshipTypes.FOLLOWS, Direction.INCOMING);
        Integer likes = user.getDegree(RelationshipTypes.LIKES, Direction.OUTGOING);
        Integer posts = user.getDegree(Direction.OUTGOING) - following - likes;
        results.put("following", following);
        results.put("followers", followers);
        results.put("likes", likes);
        results.put("posts", posts);
        return results;
    }
Part of our CreateUserTest can be seen below. We resolve our URI and send a JSON payload as our input, making sure our actual results matched the expected outcome. The hash string is the only surprise as it is added when the User is created. We will not be storing passwords in plain text. Our front end application will send us encrypted strings that look more like “$2a$10$8znG1WqeXOy9t/5aet62LuHnO5tv.dxtn3T2uAoA5T5gIxlOovnKW” so don’t worry. But I am getting ahead of myself.
public class CreateUserTest {
    @Rule
    public Neo4jRule neo4j = new Neo4jRule()
            .withExtension("/v1", Users.class);

    @Test
    public void shouldCreateUser() {
        HTTP.POST(neo4j.httpURI().resolve("/v1/schema/create").toString());

        HTTP.Response response = HTTP.POST(neo4j.httpURI().resolve("/v1/users").toString(), input);
        HashMap actual  = response.content();
        Assert.assertEquals(expected, actual);
    }
    private static final HashMap input = new HashMap<String, Object>() {{
        put("username", "maxdemarzi");
        put("email", "maxdemarzi@hotmail.com");
        put("name", "Max De Marzi");
        put("password", "swordfish");
    }};

    private static final HashMap expected = new HashMap<String, Object>() {{
        put("username", "maxdemarzi");
        put("email", "maxdemarzi@hotmail.com");
        put("name", "Max De Marzi");
        put("password", "swordfish");
        put("hash","58750f2179edbd650b471280aa66fee5");
    }};
We will call it good for today, but stay tuned for more next time as we add the follows functionality. On to part 3.

[…] part two we defined our API and got registering a user, checking a user and getting a user profile. A social […]
[…] On to part 2. […]