There are multiple ways to setup a Neo4j Cluster on Amazon Web Services (AWS) and I want to show you one way to do it.
Overview:
- Create a VPC
- Launch 1 Instance
- Install Neo4j HA
- Clone 2 Instances
- Configure the Instances
- Start the Coordinators
- Start the Neo4j Cluster
- Create 2 Load Balancers
- Next Steps
We’ll start off by logging on to Amazon Web Services and creating a Virtual Private Cloud:

We’ll create a VPC with a Single Public Subnet Only (but you may choose a VPC with Public and Private Subnets if you’d like).

Once our VPC is up and running, we can create instances by heading over to EC2.

You may choose any Amazon Machine Image you’d like, but I’m going to go with Ubuntu 12.04 LTS.

You can pick any Instance Type you want, depending on how large your data is. I’ll just create a small instance type, but make sure to launch it in the VPC.

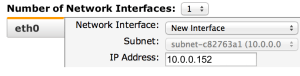
I’ll choose the IP to be 10.0.0.151. I will create 2 more instances later which will be 152 and 153.

I will create a new Key Pair, call it “ha_cluster” and download it to my machine.

I’ll create a new security group called “neo4j_ha_cluster” and add all traffic within 10.0.0.0/24:
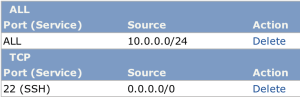
Zookeeper and Neo4j will communicate only within this network. After our instance is created we will allocate a new Elastic IP, making sure to select VPC where it prompts you where you want to use it.

Associate the Elastic IP to the currently running instance.

Open a terminal window and head to the directory where you saved the ha_cluster.pem file earlier. Then change the permissions:
chmod 400 ha_cluster.pem
We will be moving that Elastic IP around a bit so we’ll use a funny way to connect to the instance via ssh so that the IP doesn’t get associated with any specific host. Replace 50.18.213.58 with your Elastic IP address.
ssh -i ha_cluster.pem -o UserKnownHostsFile=/dev/null -o StrictHostKeyChecking=no ubuntu@50.18.213.58
Once we’ve logged on to the server, let’s run update and install java.
sudo apt-get update
sudo apt-get install openjdk-6-jdk
Next we’ll download and install Neo4j Enterprise edition and rename the directory to just neo4j.
wget http://dist.neo4j.org/neo4j-enterprise-1.8-unix.tar.gz
tar -xvzf neo4j-enterprise-1.8-unix.tar.gz
mv neo4j-enterprise-1.8 neo4j
We need to do a little tweaking to the upper limit of the number of files we can have open. We can sudo into root and edit the limits.conf file:
sudo su
vi /etc/security/limits.conf
We’ll add two entries setting the file limits to 40000 for the ubuntu user.
ubuntu   soft    nofile  40000
ubuntu   hard    nofile  40000
Reboot the instance and while waiting for it to come up we will make use of an unmanaged extension created by Chris Gioran to work with the Amazon Load Balancers.
git clone git://github.com/maxdemarzi/ha-rest-master-info.git
cd ha-rest-master-info
mvn package
cd ..
This will create a ha-rest-master-info/target/ha-rest-master-info-0.2.jar file which we want to copy to our instance.
scp -i ha_cluster.pem -o UserKnownHostsFile=/dev/null -o StrictHostKeyChecking=no ha-rest-master-info/target/ha-rest-master-info-0.2.jar ubuntu@50.18.213.58:/home/ubuntu/neo4j/plugins
Reconnect to the instance and check the update open file limits now returns 40000.
ssh -i ha_cluster.pem -o UserKnownHostsFile=/dev/null -o StrictHostKeyChecking=no ubuntu@50.18.213.58
ulimit -n
Also make sure the jar file made it:
ls neo4j/plugins
ha-rest-master-info-0.2.jar  README.txt
Great, now let’s configure Neo4j to use it. Edit neo4j-server.properties and make the following changes:
Set the Server to the current ip. You will need to change this to 152, and 153 for the other cluster members.
vi neo4j/conf/neo4j-server.properties
org.neo4j.server.webserver.address=10.0.0.151
We also need to tell Neo4j to run in High Availability mode by uncommenting the line below:
org.neo4j.server.database.mode=HA
Finally enable the code in the jar file we added:
org.neo4j.server.thirdparty_jaxrs_classes=org.neo4j.ha.server.rest.info=/ha-info/
We’ll also need to edit the neo4j.properties file:
First, set the server id to 1 (or 2 or 3 on the other instances).
vi neo4j/conf/neo4j.properties
ha.server_id = 1
Second, set the addresses of the 3 coordinators:
ha.coordinators=10.0.0.151:2181,10.0.0.152:2181,10.0.0.153:2181
Finally, change the server setting to 10.0.0.151 (or 152, 153 on the other instances).
ha.server = 10.0.0.151:6001
Let’s setup the 3 coordinators, one for each of the ec2 instances we’ll spin up by replacing the entries in coord.cfg to match the entries below.
vi neo4j/conf/coord.cfg
server.1=10.0.0.151:2888:3888
server.2=10.0.0.152:2888:3888
server.3=10.0.0.153:2888:3888
Finally we want to make sure all the instances know about each other so edit your hosts file:
sudo vi /etc/hosts
10.0.0.151 ip-10-0-0-151
10.0.0.152 ip-10-0-0-152
10.0.0.153 ip-10-0-0-153
At this point, we want to make two more copies. So we can do these steps all over again two more times, or better yet create an image of your instance and clone it.

It will restart the instance you are on (and log you off), but in a minute or three you should be able to go to the Images > AMIs section and launch a clone of your first instance.
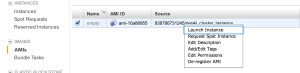
Make sure you launch it inside the VPC and not on EC2.
![]()
Launch 1 at time so you can specify the ip address to 10.0.0.152 and 153.
Select the already existing security group, and let the instances come up.

Make sure you modify the neo4j.properties and neo4j-server.properties files as mentioned above:
vi neo4j/conf/neo4j.properties
ha.server_id=2 (and then 3)
ha.server = 10.0.0.152:6001 (and then 153)
vi neo4j/conf/neo4j-server.properties
org.neo4j.server.webserver.address=10.0.0.152 (and then 153)
You’ll also want to set the Zookeeper coordinator ids on each instance:
On instance 1:
echo '1' > data/coordinator/myid
On instance 2:
echo '2' > data/coordinator/myid
On instance 3:
echo '3' > data/coordinator/myid
Start the coordinators on all 3 instances:
neo4j/bin/neo4j-coordinator start
Finally start Neo4j on all 3 instances (using the no-wait option):
neo4j/bin/neo4j start-no-wait
Starting Neo4j Server...WARNING: not changing user
process [2213]...Started the server in the background, returning...
Give them a minute to start up and then you can test which one is the master with:
curl http://10.0.0.151:7474/ha-info/masterinfo/isMaster
true
Now we will setup two load balancers. A load balancer where we will point our “reads” and another load balancer where we will point our “writes”.
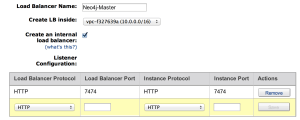
Create a new load balancer, and set the ports to 7474:

For our read load balancer we will point the health check to the root:

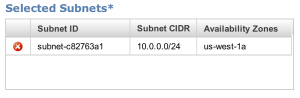
Add our VPC subnet:
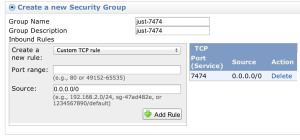
As well as create a new security group that allows just port 7474 to go through:
Then we will create a second load balancer that points just to the Master:
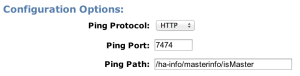
Using /ha-info/masterinfo/isMaster as our health check path.
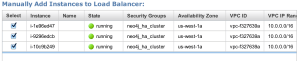
Add all three instances to both load balancers:
Give them a few minutes to come up:
![]()
Then you can check their status. All three instances should report “In Service” for the read load balancer:
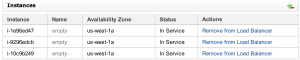
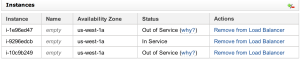
Only one instance should report “In Service” for the write load balancer:
We can test that they are both up and running by:
curl internal-Neo4j-Up-1172790076.us-west-1.elb.amazonaws.com:7474/
{
  "management" : "http://internal-Neo4j-Up-1172790076.us-west-1.elb.amazonaws.com:7474/db/manage/",
  "data" : "http://internal-Neo4j-Up-1172790076.us-west-1.elb.amazonaws.com:7474/db/data/"
}
…and to make sure the write load balancer is pointing to the master:
curl internal-Neo4j-Master-864793314.us-west-1.elb.amazonaws.com:7474/ha-info/masterinfo/isMaster
true
Now you have a Neo4j cluster up and running on a VPC on the Amazon cloud. You can point your Application servers to those load balancers and go from there. If this seemed a little complicated… well it is. Look for a simplified clustering solution in Neo4j version 1.9.
Checkout the different configuration options in the Neo4j Documentation. Particularly the ha.pull_interval and ha.tx_push_factor settings.
If you run into trouble with Zookeeper, you should reset the Coordinator cluster to a clean state, by shutting down all instances, removing the data/coordinator/version-2/* data files and restarting the Coordinators.
Also take a look at Harold Spencer Jr. blog post on using eucalyptus and the DIY on Amazon EC2 guide.
Would love some help making this process easier, so if you have mad Amazon EC2 skills and know how to better automate this, please comment below. Thanks!

Nice blog. Guess I got another project over the holidays for Neo4j + Eucalyptus. :-). Keep up the great work.
Reblogged this on More Mind Spew-age from Harold Spencer Jr. and commented:
Neo4j Cluster on Amazon VPC: HA Graph Database Cluster in the Clouds!
[…] Setting Up a Neo4J Cluster on Amazon by Max De Marzi. […]
Hi Max, maybe it’d be a good idea to create a Pallet crate for automating this kind of setup (or at least parts of it). Unfortunately I only have minor experience with pallet, but it should be fairly straight forward and one could take some important steps/principles from other existing crates, e.g. pallet-hadoop:
http://palletops.com/
https://github.com/pallet/pallet-hadoop
Thanks for this great setup guide Max. It is indeed complicated for both setup and maintenance.
It’s been said that Neo4j 1.9 will eliminate the ZooKeeper, I wonder how then the distributed synchronization will work?
http://blog.neo4j.org/2013/01/2013-whats-coming-next-in-neo4j.html